
This article was updated. Jump to Update 4.
Hey lovely people!
I learned this little trick from a former co-worker and since I saw it the first time I just knew that I must-must-must make a little article about it!
Glow
So, I build a little Unreal demo scene (which you can download here) and as you can see, it’s a nice little asymmetric volumetric glow.
Now, you may think this is a little volume-shader interpreting an SDF or maybe a geometry with Fresnel to give it soft edges (read more about alternative solutions below). But no! It’s in fact just one little plane with only four vertices and a simple radial gradient as alpha. The trick is:
- The plane is always oriented toward the camera like a billboard
- One vertex of the plane is being pushed upward, depending on the camera view. If we’re looking from above, the vertex is not offset at all. But if we look from the side, the vertex is pushed up in the air.
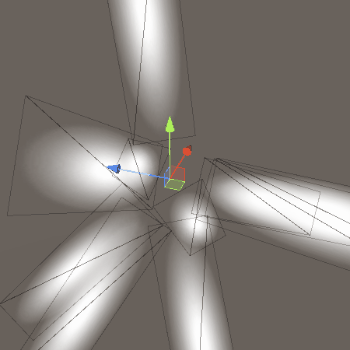
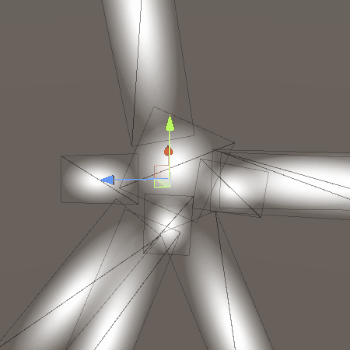
Here is a visualization how the plane is deformed. On the left, a simple wireframe-texture shows the structure of our plane and on the right you can see that only the upper vertex is allowed to move because all others are masked out via Vertex Color.
Yes, looking at the debug-visualization, we can see that there is a little “flippity flip” problem when the camera is looking from above, but since we’re using a very simple radial gradient as alpha it’s not visible in the final version.
Apart from that little issue, I just love how simple this trick is and how it still gives the impression of a simple volume! 💘
As mentioned, you can download the Unreal project, but here is the mesh & material for a quick preview:


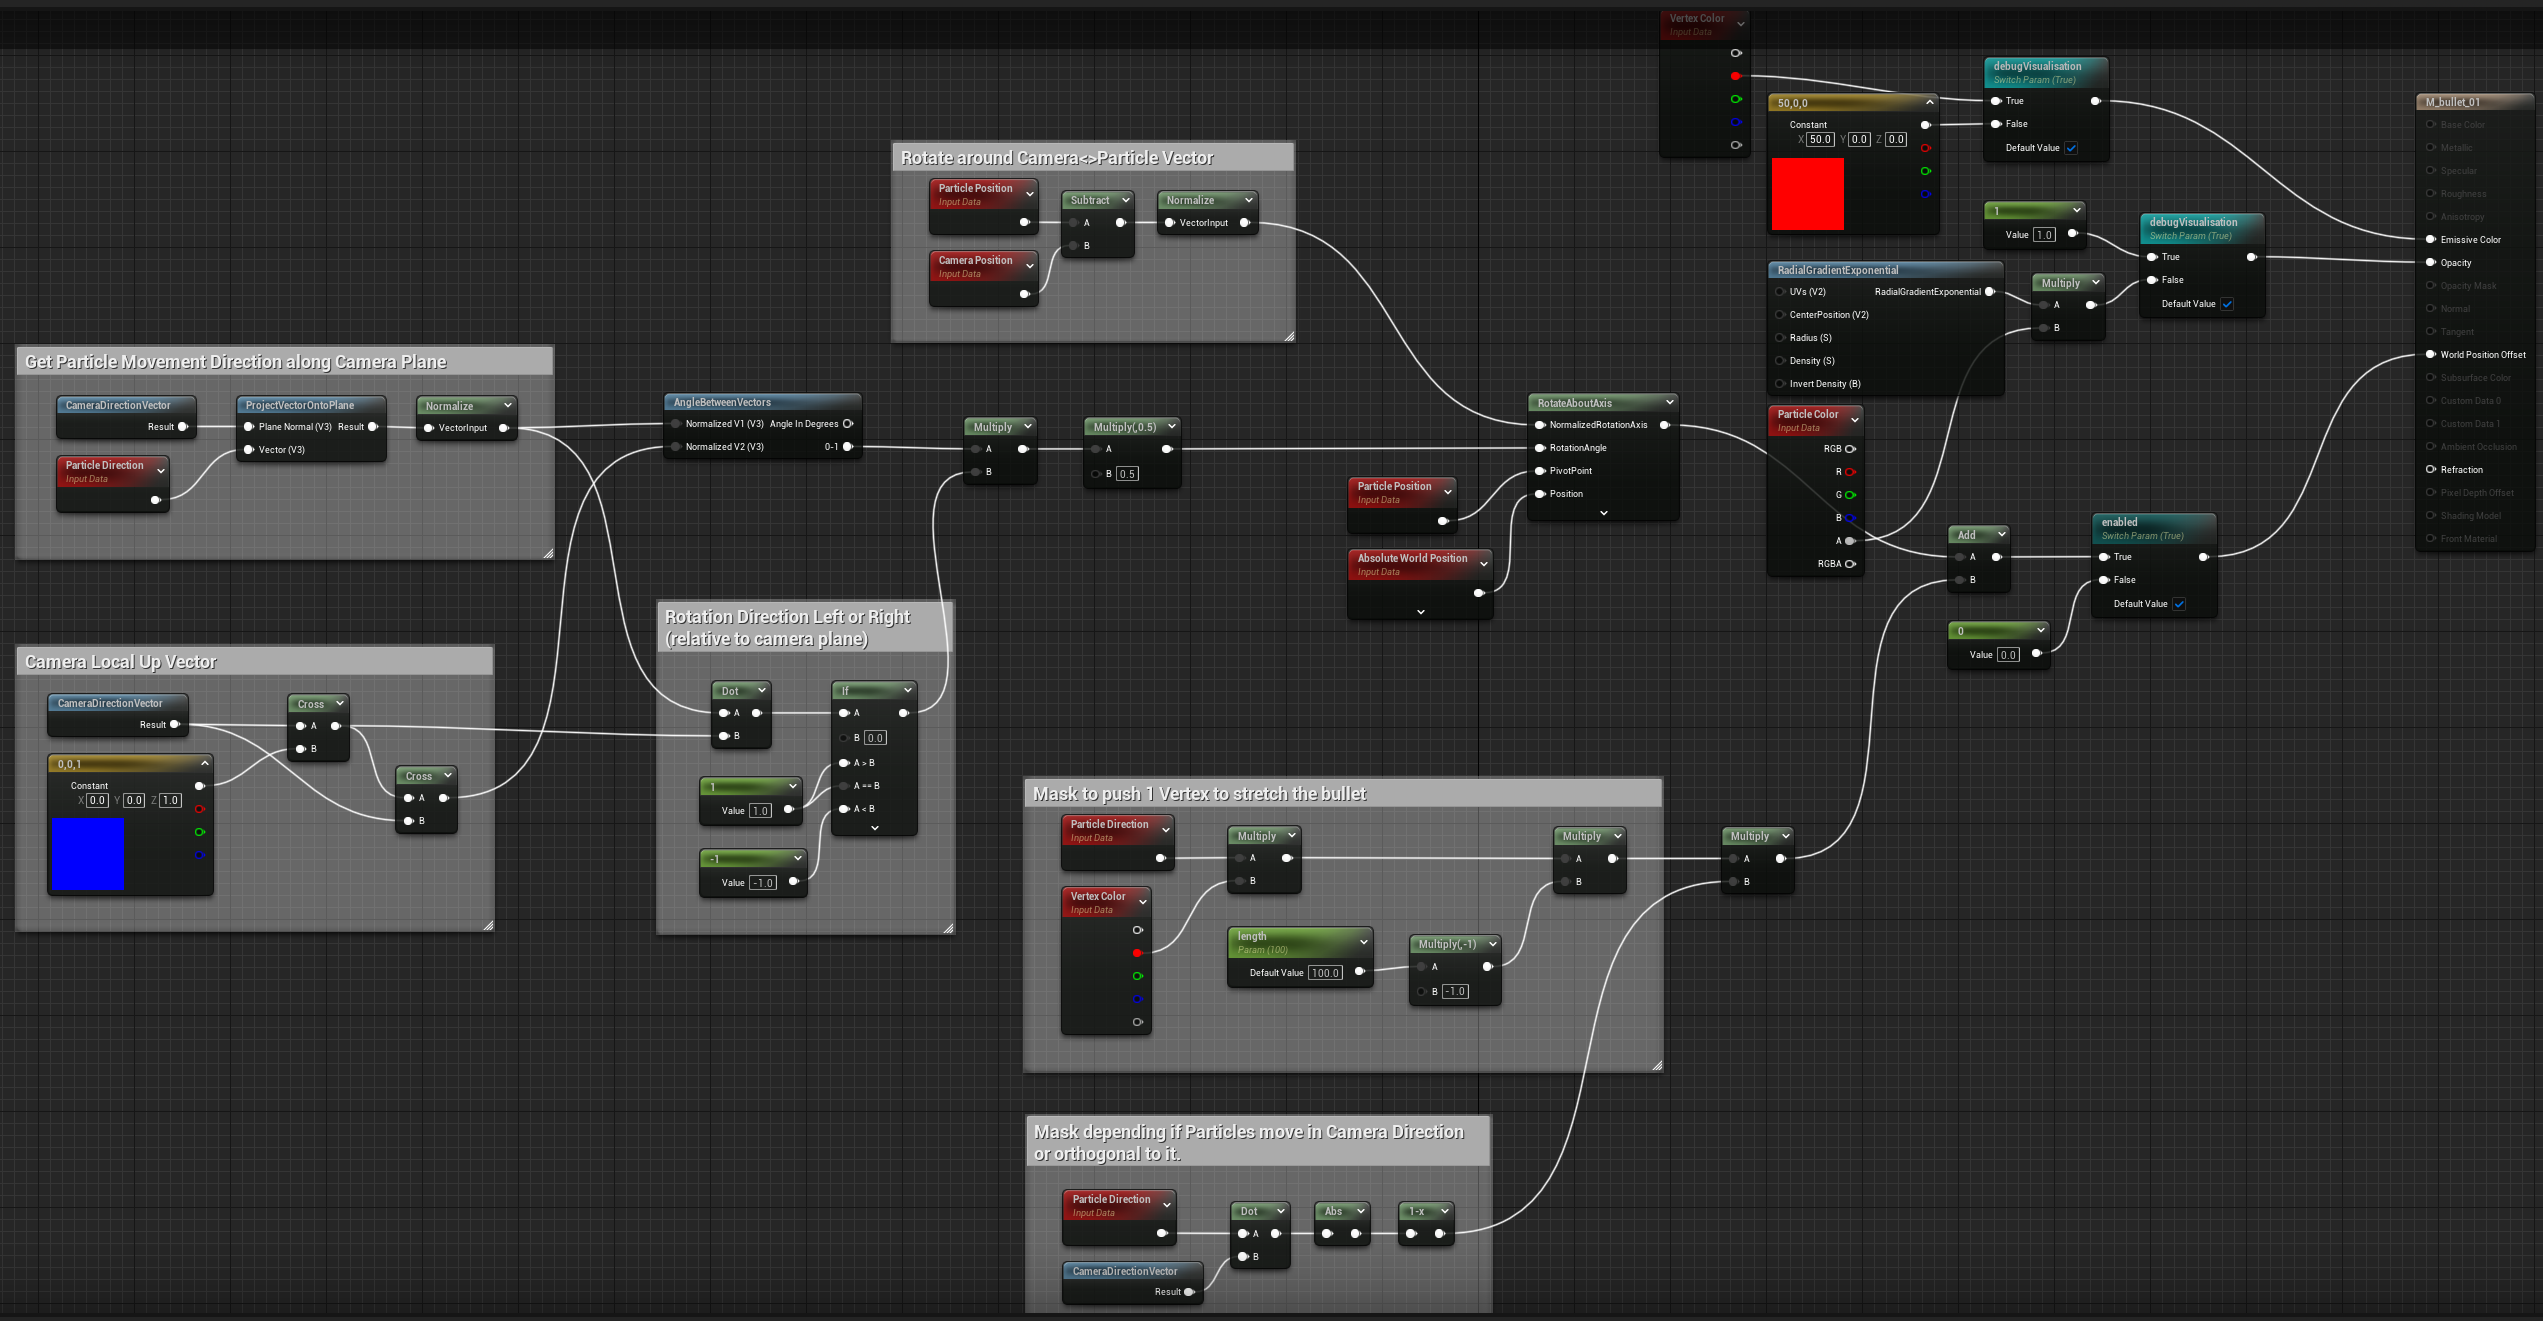
Laser Bullet
I tried to adapt this trick to be used on particles, which wasn’t as easy as I thought. Thank you Deathrey for the help though! 💗 It works overall, but there are smaller artifacts, like a little “snap” when particles move from left to the right side of the screen. Still, I’m happy that I made it as far as building this little demo, and if you’re capable of making a more stable solutions: Let me know!
Another issue I had is that the orientation doesn’t work when looking from above at the particle system. Some particles work well, but others don’t. :( I know there are smarter people out there than me, and I’m looking forward to see if someone will make a proper version.

For a bit more insight, here is a little debug view with the different steps:
- Mesh Particle oriented to Camera Plane
- Rotate Mesh Particle along its velocity
- Stretch Mesh Particle by offsetting one vertex
And this is the material. Thanks again for the help, Deathrey!
Alternative Solutions
The Crossed Plane
A common approach is to use crossed planes, but as you can see in my example below, it’s really hard to let them appear as one volume. Even though the planes fade out via Fresnel when being looked at from the side, they still stand out quite strong. :,(
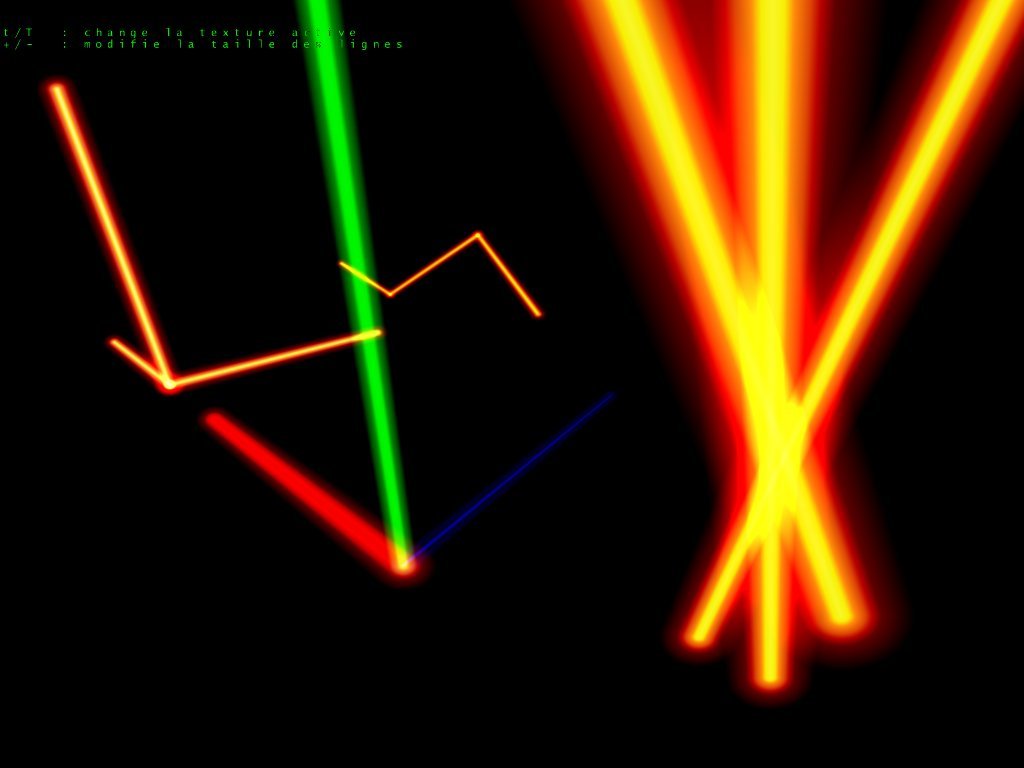
The Volume Line Renderer
Sébastien Hillaire created a line renderer in and offers the code on his GitHub. Also, you can find the old articles with more information here and here.
(Thank you Torbach for telling me about this trick!)
The Way of the Jedi
The laser knife of Jedi: Fallen Order uses several crossed planes. Above I said that crossed planes can be hard to make look right, here the team did a great job of making the blade look nicely volumetric.
Very interesting: the main mesh is highly tessellated at its core. I’m not exactly sure why such a high geometry resolution is necessary, but if anyone knows: Leave a comment!
That’s it! I hope you liked this little overview about techniques to fake a volume.
Have a very nice day!
Simon
Alex Darby did something similar almost 10 years ago, and allowed me to show his approach of using a ring geometry which get deformed:
“I used a ring for that effect, the inner and outer radius allowed it to adjust the space between character and the aura and the size of the aura spikes. Some extra bits with velocity based orientation and UV manipulation handled the aura flow direction”
Toot by Alex Darby

Another update came in thanks to Niels Dewitte, Jukerlaw, Partikel, MartinE and Wyeth! Thank you so much for all the extra infos!
Turns out, Unity has a nice particle alignment built-in, where velocity aligned particles take on a non-stretched form (as every camera-aligned particle does) when being looked at along their travel direction:
While Unreal doesn’t seem to offer the same, it still has something in its sleeves! Thanks Wyeth for providing an example for how to use the built-in Unreal nodes: Sprite_Capsule, Sprite_Ellipsoid & Sprite_TearDrop! As you can see: Still only one plane, but Unreal even deforms the UVs and recalculates the normals so that it really looks like a real geometry.
A small note: We can see that there’s a tiny artifact here as well when the camera looks downward: Sprite_capsule and Sprite_TearDrop disappear for a frame. Also: Only with Sprite_Ellipsoid I was able to make a soft glow.
Here are the Unreal Material examples, but of course you can find everything in the project files as well:
Here is an example of how to use the Sprite_Capsule on default camera aligned sprite particles:
By the way, this post from Rune Skovbo Johansen contains more very interesting information about particle stretching: https://twitter.com/runevision/status/1144585405343379457
brocktoon (from the comment section) solved the riddle about the highly tessellated geometry in the lightsaber!
“I’m guessing the lightsaber mesh is that dense to accommodate a smear effect.”
And yes, that is true! Just as a reminder, this is what I found when looking closely at the geometry:
I just had another look and if you watch closely, the lightsaber “blade” has a smear effect which does not come from motion blur. Here a video played in 25% speed to show it better:
And here is the wireframe while swinging the luminous knife, which explains what all this geometry is for. Very good to know! :)
Amit Mehar took the time and improved the material I was providing a little bit (his original post). Since this happened on TwiX (and nobody knows who long the network will still exist) I’m adding Amit’s suggestions here (thanks Amit!!):
“I took a shot at fixing the Bullet material and I think this seems to work :? Adds a transcendental function but looks cleaner I think :p”

“Also, since Sprite_Capsule outputs the normals in WorldSpace we should disable “Tangent Space Normal” property on M_spriteCapsule_01 :)”
“Slightly more accurate/safer version. 1. We don’t have to normalize ParticleDirection as atan2 doesn’t require unit vector. 2. We can add a check if the particle is moving in camera direction (xy comp = 0). This will add some cost and probably not needed (edge case).”

I’m guessing the lightsaber mesh is that dense to accommodate a smear effect.
I need to check how the mesh looks while swinging the sword!
You were right! I’ve just updated the article. Thank you! https://simonschreibt.de/gat/four-vertex-volume/#update3
Now I understand how they make that aura when flying in DBZ Kakarot :D
How would something like this be done in Unity? I’m trying to make a shader that basically appears like a glow, around a laser object
The shader code should be possible to re-do in Unity as it’s also “just” HLSL or the same logic. You can download Unreal, look at how it works there and then replicate everything. Often, you can double-click in Unreal on a node and then it opens and shows how exactly the logic works behind.