

This article was updated. Jump to Update 1. Update 2. Update 3.
A small detail which impressed me a lot (besides the great graphics in Fallout 3) is how they did their worn edges.
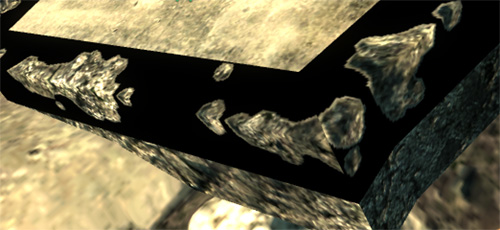
In the top part of the image below you can see a very nice broken stone. I think it looks really cool and “high poly”. But if you look at it from the side, you see, that the stone geometry IS pretty low poly (middle part of the image)…

If you look at it from the very near, you can see, that they have a really low poly geometry and two textures on it: the “smooth” stone and the broken edge. And to hide the hard transition between them — or let’s say — to create a pleasant transition, they placed these normal mapped holes.


I investigated the stuff a bit and for anyone who’s interested. Here’s a wireframe of the stone. That’s important, because I thought, maybe they did an additional geometry layer bent around the edges. More about this, at the bottom of this article.
Further, I checked out the textures of the edges. Interesting to say, that Fallout uses half the size of the diffuse map for their normal maps. That’s why in the next image, the resolution of diffuse-/normal map is different. Also, I marked which part of the texture is visible in my screenshot.
By the way, they save their specular map into the alpha channel of the normal map. In the case of these decals, the specular is totally white. I wonder why they just don’t add an alpha channel then. Normally when a texture doesn’t hold an alpha channel, the return value is 1.0 which means “white”. But I’m sure there is some good point I just can’t see.
Let’s talk about the decals. Throttlekitty mentioned that they use decals in a combination with parallax mapping. About the last point I’m not sure, because normally you need a height map for parallax mapping (in addition to the normal map, at least what this article says) and this doesn’t seem the case.
But wichenroder gave me this very interesting link about the Cry Engine which explains this stuff.


But I’m not 100% convinced that they (Fallout 3) used this technique because i can’t see any extra geometry. Even not when I watch the wireframe right in the game (red line was added by me to make clear which wires belong to the stone, you look at the stone from below, above the stone you can see the sky sphere):
After another round of investigation loaded up the GECK which is a Tool for creating MODs and stuff for Fallout. In there I could see something fascinating. You can blend away everything and this stays:
Falk mentioned something: maybe they place the decals in their editor and save this as prefab. Then the level designer could use the prefabs and the decal data is stored wherever. BUT today i talked to a guy at Crytek where another guy (really, at Crytek works another guy??) works which worked at Bethesda in the past. And he (the first mentioned guy) told me, that they (Bethesda) does it exactly the same way as it is in the Cryengine (article mentioned above). OK…possibly I should check out the NIF tools, and maybe there I can see some extra geometry.
Anyway, an interesting note: I asked how they blend away these decals, and it was told to me, that they just delete these decal planes in the LoDs. Clever!
I asked my colleague Markus if he knows any interesting analyzing tools (because he’s analyzing our own game) and he suggested me the Intel GPA. And with this cool tool (rhyme!) I was able to take this screenshot:
No, I didn’t paint some black on the texture. I just disabled Alpha1/Alphatest and this is the result. It’s possibly not a proof, but a hint that they used extra geometry for the stuff.
Leonardo Iezzi created an awesome tutorial about this kind of edge-detail:
I moved this update into a separate article because it’s “too cool” to be forgotten here as just a tiny update. :)
i wanna say ur tutor is great and help me a lot ! thank u so much
Fallout titles are really huge and use such decals everywhere. The process described by Crytek doc demands some precious time on each asset. Do you know if they used some sort of script to accelerate the creation of this effect?
BTW: I’m really addicted to your site. Congrats!
That’s a good question but I really don’t know :,( I’d expect that it’s handmade but yeah, maybe they have a nice script for optimizing the workflow..
(Writing in English because you and all other people here do)
I could not find the exact mesh you were using in this article, but there are many, many objects which have these kinds of decals, and as far as I can tell, they all do use the exact same technique you mentioned in the article from the CryEngine, with the extra geometry wrapped around the edges. This can be seen clearly when the meshes are viewed in NifSkope (https://github.com/niftools/nifskope/releases):
https://goo.gl/photos/pWewKwV9of7m9TPW6
You can also see how the decal geometry is just a little larger than the solid edges:
https://goo.gl/photos/fSVVsHicT4wgZmQu8
Also, about the normal map’s alpha channel: Yes, Bethesda games use the alpha channel as the specular map, and more opaque means more glossiness, but in Oblivion and Fallout 3 (but not for most of the textures in Skyrim and none in the Skyrim Special Edition), if the texture does not have an alpha channel, this is interpreted as “no glossiness”. Otherwise you would need a completely transparent alpha channel to achieve this. However, textures with an alpha channel (e.g. DXT5 compression) are twice as large as textures without one (e.g. DXT1), so the reason was probably just to save space. DXT1 can have a 1-bit alpha channel, but I haven’t seen this used in normal maps. They seem to have changed this in their newer games, beginning with Skyrim, where this only applies to some textures (mainly terrain), but I suspect they got rid of it completely in Fallout 4, as they apparently did for the Skyrim Special Edition.
By the way, this blog is awesome, I have just discovered it yesterday, but I’ve already learned some amazing stuff. I will certainly keep an eye on it, or two.
Wow thanks for your investigation and the links! Actually they could use the B-Channel for the specular and calculate the normal out of the R- and G-Channel since the normal is always 1.0 so that 1.0 – R – G = B. But maybe they didn’t want to have the extra-cost in the pixel shader…